Gingerbread Nails: Cute Holiday Nail Art Ideas & Designs
Gingerbread Nails: Your Ultimate Guide to Festive Holiday Nail Art
As the holiday season approaches, everyone looks for ways to add a festive touch to their style. Gingerbread nails have emerged as a top trend because they perfectly combine warmth, creativity, and seasonal charm. Inspired by the iconic holiday cookies, these nails showcase cosy browns, creamy whites, and festive patterns that bring joy to every manicure. Whether you are attending a winter party, celebrating Christmas, or just want a cheerful everyday look, gingerbread nails offer a unique and playful aesthetic that fits every occasion.
Not only are these nails visually appealing, but they also allow for creative self-expression. Each design is like a mini artwork on your fingertips, ranging from simple dots and stripes to intricate gingerbread men or holiday scenes. Additionally, the versatility of gingerbread nails ensures they can be both elegant and whimsical, depending on your style preference. For anyone seeking a manicure that is both festive and Instagram-worthy, this nail trend is an absolute must-try. Also readhere

The Key Features of Gingerbread Nails
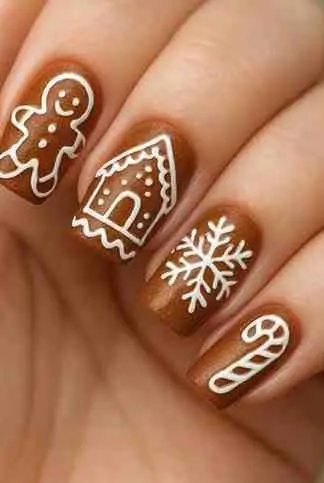
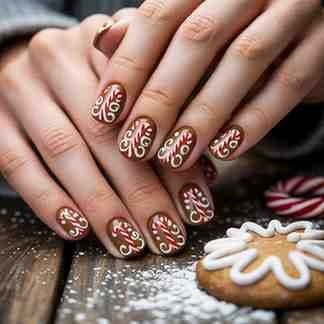
Understanding the distinctive elements of gingerbread nails helps you create the perfect holiday-inspired look. The signature feature is the colour palette: warm, earthy browns that mimic gingerbread, accented by creamy whites that resemble icing. Often, subtle touches of red, green, or gold are added to highlight festive details such as candy canes, ribbons, or snowflakes. This combination of colours ensures the nails are eye-catching yet cosy.

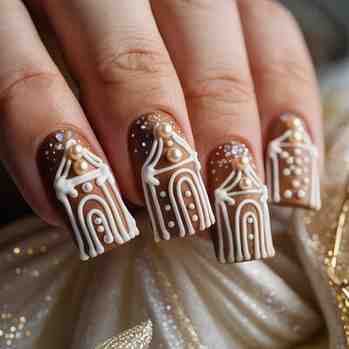
Another defining aspect is the design style. Most gingerbread nails feature intricate patterns that replicate cookie decorations, including swirls, dots, stripes, and gingerbread man motifs. Some designs incorporate glitter or rhinestones to create a glamorous effect, while others keep it simple with matte finishes for a more understated, cosy vibe. The mix of textures and finishes makes these nails versatile for both casual wear and holiday celebrations.

Materials and Tools You’ll Need
Creating stunning gingerbread nails requires a few essential tools and materials. Start with a reliable base coat to protect your natural nails and a high-quality top coat for sealing your designs. Choose warm brown polishes as your primary colour and creamy white nail art pens or fine brushes for detailing. Optional items include glitter, decals, or rhinestones for added festive flair. Essential nail tools such as a file, buffer, cuticle pusher, and dotting tools will help achieve professional-quality results.

By gathering the right materials, you can ensure your gingerbread nails look neat, vibrant, and long-lasting. Taking a few minutes to prepare your nails and tools properly before starting will make the entire process smoother and more enjoyable.
DIY Guide & Style Inspirations
Prep Your Nails for the Perfect Canvas

Before starting, clean your nails thoroughly to remove any residue. Shape them with a file and gently push back your cuticles. Buffing the surface lightly ensures smooth application. Proper preparation lays the foundation for long-lasting gingerbread nails, making each design crisp and professional-looking.
Applying the Base Coat
A high-quality base coat protects natural nails and provides a smooth surface for polish. It prevents staining from darker colours and helps your gingerbread nails stay intact longer. Take your time to apply an even layer and let it dry completely before moving on.

Choosing the Right Base Colour
Warm browns, caramel shades, and beige tones serve as the perfect backdrop for gingerbread nails. Apply two even coats, allowing each to dry thoroughly. Matte finishes give a cosy, cookie-like appearance, while glossy finishes provide a more festive shine.
Creating Icing and Decorative Details
Use a white nail art pen or fine brush to draw delicate icing-like patterns. Popular designs include swirls, dots, stripes, gingerbread men, snowflakes, and candy cane lines. Mixing patterns across different nails adds creativity and uniqueness to your gingerbread nails. Patience and precision here are key to achieving professional results.
Adding Embellishments for Extra Flair
For those seeking a glamorous touch, embellishments like glitter, rhinestones, or holiday-themed decals elevate your manicure. Strategic placement of gold or red accents enhances the festive look without overcrowding your gingerbread nails. Experiment with subtle sparkles or bold glitter for a customised style.

Sealing Your Design With a Top Coat
Applying a top coat protects your artwork and ensures durability. Matte top coats maintain a soft, cosy look, while glossy or glitter-infused top coats enhance shine and festivity. Sealing edges properly prevents chipping, keeping your gingerbread nails flawless for longer.
Aftercare for Long-Lasting Nails
Clean up any excess polish around the cuticles and apply nourishing cuticle oil. This step keeps nails healthy and vibrant. Avoid excessive water exposure, and consider wearing gloves during chores. Proper aftercare ensures your gingerbread nails maintain their beauty for days.
Style Ideas for Gingerbread Nails
Minimalist Chic: Simple matte brown nails with subtle white dots or lines for everyday wear.
Festive & Playful: Combine stripes, candy cane accents, snowflakes, and gingerbread men for a lively holiday vibe.
Glam Holiday Look: Add glitter, metallic accents, or rhinestones. Mixing matte and glossy finishes creates an eye-catching effect.
Creative Mix & Match: Alternate designs across nails, combining plain, patterned, and glittery styles for a unique manicure.
Troubleshooting Common Issues
Smudging: Apply thin coats and let each layer dry completely.
Chipping: Seal nail tips with top coat and avoid harsh activities.
Design Mistakes: Use a small brush dipped in polish remover to fix errors.
Polish Bubbles: Shake polish gently before use and avoid thick layers.

Tips for Beginners and Pros
Beginners: Stick to simple designs like dots, stripes, or single gingerbread men. Consider press-on nails for easy application.
Intermediate: Try mixed designs with subtle embellishments, candy cane stripes, or seasonal accents.
Advanced: Explore 3D nail art, complex holiday scenes, and detailed gingerbread house patterns.
Advanced Tips and Troubleshooting

Beginners:
Start with a simple warm brown base coat. Use a white nail art pen or dotting tool for minimal designs, such as icing lines, dots, or a single tiny gingerbread man on an accent nail.
Press-on nails are a great alternative if you don’t want to paint directly on your natural nails. They allow you to achieve clean gingerbread nails without worrying about smudging or uneven polish.
Choose matte finishes for a subtle cookie-inspired effect or glossy finishes for a more festive look.
Intermediate Artists:
Experiment with mixed designs across nails. For example, paint one nail with candy cane stripes, another with a snowflake, and a third with subtle glitter accents.
Combine matte and glossy textures for a more dynamic and professional-looking manicure.
Add small embellishments like gold or silver studs to highlight specific details.

Advanced Nail Artists:
Try complex designs such as 3D gingerbread houses, detailed snowflakes, or multi-layered icing patterns.
Use a mix of textures and techniques like water marbling, stamping, or fine detailing brushes.
Incorporate rhinestones, crystals, or holographic glitter to make your gingerbread nails stand out at parties or photoshoots.
For true customisation, experiment with gradient brown tones to mimic baked gingerbread and icing swirls.
Troubleshooting Common Problems
Even experienced nail artists encounter issues while creating gingerbread nails. Here’s a detailed guide to fix them:

Smudging Designs: Always allow each layer to dry completely before proceeding. Use a fast-drying top coat carefully over delicate designs to prevent smearing.
Chipping Polish: Seal edges of nails with top coat and avoid excessive handwashing or exposure to harsh cleaning agents. Gel polish can extend the longevity of your manicure to 2–3 weeks.
Uneven Patterns or Mistakes: Small errors can be corrected with a fine brush dipped in nail polish remover. Practice complex patterns on a nail art wheel or paper first.
Bubbles or Thick Polish: Shake bottles gently before use and apply thin, even layers. Thick layers can trap air and lead to bubbles or uneven drying.
Loss of Shine or Dull Finish: Reapply a clear top coat every few days, especially on nails with glitter or embellishments, to maintain a vibrant look.
Fun and Creative Variations for Gingerbread Nails

To make your gingerbread nails truly unique, experiment with these variations:
Classic Cookie Look: Matte brown base with simple white icing lines and dots, perfect for everyday festive wear.
Candy Cane Accent: Red and white stripes on one or two nails, paired with subtle brown nails for contrast.
Snowy Sparkle: Add fine glitter or snowflake decals to accent nails, giving a winter wonderland effect.

Mixed Festive Theme: Combine gingerbread men, candy canes, snowflakes, and little ornaments across nails to tell a holiday story.
Elegant Minimalism: Matte beige or soft brown nails with tiny white dots along the tips for a subtle festive effect.
Glitter Glam: Apply holographic or gold glitter on accent nails or the tips for a party-ready look.
Textured 3D Nails: Use gel or acrylic to add 3D icing swirls or miniature gingerbread cookies for a bold, professional design.

Maintenance and Aftercare for Long-Lasting Nails
Apply nourishing cuticle oil daily to keep nails healthy and hydrated.
Avoid prolonged water exposure, such as washing dishes without gloves, which can weaken the polish.
Reapply top coat every 2–3 days to maintain shine, especially on nails with glitter or decals.
Keep a small nail brush and polish remover handy for quick touch-ups to ensure your gingerbread nails always look perfect. Also readhere

Conclusion:
Gingerbread nails are more than just a seasonal trend; they are a way to express creativity, celebrate the holidays, and enjoy festive self-care. The combination of cosy browns, icing-inspired details, and fun embellishments makes them perfect for all skill levels, from beginners to advanced nail artists.
By following this guide, anyone can create stunning gingerbread nails at home, whether opting for a simple, minimalist look or an elaborate, party-ready design. Their versatility allows for personalised touches, ensuring your manicure is as unique as you are.
Celebrate the holiday season with nails that tell a story, one cookie-inspired design at a time!
FAQs
Q1: How long will gingerbread nails last?
A1: With proper prep and top coat application, regular polish lasts 5–7 days, while gel polish can last 2–3 weeks.
Q2: Can I use press-on nails for gingerbread designs?
A2: Absolutely! Press-on nails are perfect for beginners and allow intricate designs without professional tools.

Q3: Do I need glitter and rhinestones?
A3: No. Glitter and rhinestones are optional. Matte or simple designs can look elegant and festive on their own.
Q4: How can I maintain my gingerbread nails?
4: Apply cuticle oil regularly, avoid harsh water exposure, and reapply top coat every few days.
Q5: Can I combine matte and glossy finishes?
A5: Yes! Mixing matte and glossy textures adds dimension and makes gingerbread nails more visually interesting.